Table of Contents
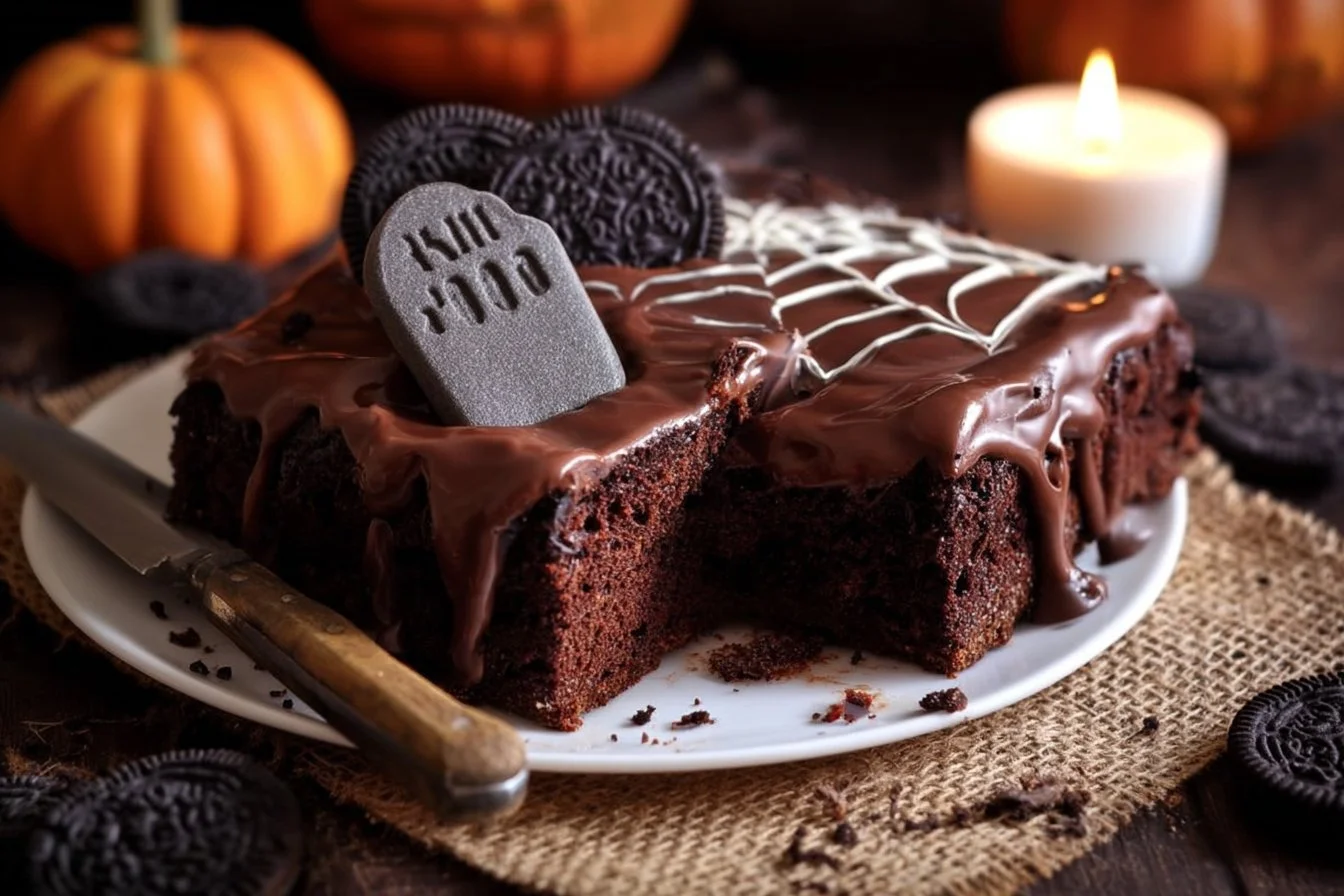
Oh, my dear friends, gather ’round! There’s something magical about the crisp autumn air and the seeping aroma of chocolate wafting through my cozy kitchen. One fateful October evening, as I rummaged through the pantry and stumbled upon remnants of Halloween treats from the previous year—think candy eyes and colorful sprinkles—I was inspired to create something special. That’s how the idea of a rich, indulgent Chocolate Cake with Halloween decorations was born!
The moment the cake began to bake, I could sense its warm, buttery fragrance teasing my senses, drawing me closer. As I pulled it out of the oven, I marveled at the deep, glossy surface and a small slice was calling my name. One bite into this decadent chocolate cake and I felt like I was dancing in a pumpkin patch, surrounded by the playful colors of Halloween. From the bittersweet depth of dark chocolate to the creamy, sweet frosting, every mouthful was a cozy embrace—perfectly cozy for those chillier nights. I can assure you, this cake will not only charm your taste buds but will also become a staple at your spooky celebrations!
Why You’ll Love This Recipe
- Easy to Make: Even beginners can whip this cake together with minimal fuss.
- Flavor-packed: Rich chocolate flavor combined with delightful textures will make your heart sing.
- Crowd-Pleasing: Perfect for Halloween parties, kids’ gatherings, or cozy family dinners!
- Decorative Fun: Let your creativity flow with fun and festive Halloween decorations.
- Comforting & Cozy: The delightful aroma fills your kitchen, adding warmth to chilly evenings.
Ingredients
- 120g dark chocolate, chopped: This adds deep richness—extra dark is even better for a more intense flavor.
- 100g butter: A must for that smooth batter; it makes the cake oh-so-moist!
- 1 1/4 cups sugar: Sweetness that complements the chocolate perfectly. Adjust a little if you like it less sweet!
- 1/4 cup oil: Ensures extra moisture, creating a tender crumb.
- 1 tsp vanilla extract: This little bottle of joy enhances richness; use pure extract if you can!
- 2 eggs: For binding all our delicious ingredients together.
- 1/4 cup cocoa powder: Adds that lush chocolate flavor—use unsweetened for the best results.
- 1 cup all-purpose flour: The foundation of our cake—sift it for an even texture!
- 1 tsp baking powder: Ensures a fluffy lift; check the expiration date for best results.
- 1/2 cup boiling water: Helps to bloom the cocoa, intensifying the chocolate flavor.
- 1 tbsp instant coffee: A secret weapon to amplify the chocolate—trust me on this one!
- 1 good pinch of salt: Balances the sweetness and enhances all flavors.
- 1 can condensed milk: For our decadent topping—think of sweet, creamy bliss.
- 1 tbsp cocoa: Deepens the flavor of that delicious topping!
- 2 tbsp chocolate powder: Adds an extra layer of chocolate goodness to the frosting.
- 1 tbsp butter (for frosting): Makes everything creamy and dreamy.
- 1 pinch of salt: Again, enhance those flavors!
- Maria cookies: These will provide delightful crunchy layers—perfect for texture.
- Chocolate biscuits (no filling): More chocolate, more crunch—yum!
- 1 tbsp melted chocolate: For drizzling or sticking on fun decorations.
Full recipe card is below.
How to Make It
Massa
- Preheat your oven to 180°C (350°F) and prepare a 9-inch round cake pan with butter and flour.
- In a bowl, melt the dark chocolate and butter together, stirring until smooth. This divine scent will soon envelop your kitchen!
- In a separate large bowl, whisk together the sugar, oil, eggs, and vanilla extract until the mixture is light and fluffy.
- Gradually mix in the melted chocolate mixture, and then sift in the cocoa powder, flour, and baking powder with a pinch of salt.
- Carefully add the boiling water (and instant coffee!), mixing until you have a delightful, glossy batter.
Cobertura de brigadeiro
- In a small saucepan, combine the condensed milk, cocoa powder, and a pinch of salt over low heat.
- Stir continuously until thickened and glossy—about 10-15 minutes—this is where the aroma will sweep you off your feet!
- Add the butter and keep stirring until you reach that perfect spreadable frosting consistency.
Decoração
- Get your creative juices flowing! Now’s the time to crush those Maria cookies and chocolate biscuits for the topping.
- You can even warm up some melted chocolate to create playful webs or ghosts as decorations—how fun!
Montagem do bolo
- Once your cake has cooled, slice it carefully into two layers.
- Spread a generous layer of brigadeiro frosting between the layers, then cover the sides and top with the rest of the frosting.
- Top with crushed cookies for a crunchy, festive flair and add those playful decorations to make it a Halloween masterpiece!
Pro Tips for Success
- Sift Your Dry Ingredients: This ensures no lumps and a lighter cake.
- Room Temperature Eggs: For a smoother batter that bakes evenly.
- Don’t Skip the Coffee: It brings out the chocolate flavor beautifully—you won’t taste it; it just enhances the chocolate!
- Temperature is Key: Always let your cake cool completely before frosting, or you risk a gooey mess!
Flavor Variations
- Mint Chocolate: Add a drop of peppermint extract for a refreshing twist.
- Pumpkin Spice: Mix a teaspoon of pumpkin spice into the batter for an autumnal flair.
- Nutty Surprise: Toss in some chopped walnuts or pecans for crunch.
Serving Suggestions
Pair this indulgent chocolate cake with a dollop of whipped cream or vanilla ice cream to create a heavenly experience. A warm cup of spiced apple cider or a cozy chai latte complements the flavors beautifully.
Make-Ahead & Storage
You can bake the cake in advance—simply wrap it well in plastic wrap and store it at room temperature for up to three days. If you frost it beforehand, be sure to keep it in the fridge!
Leftovers
If you happen to have leftovers (which I doubt after making this beauty!), you can crumble them into parfaits with yogurt and fruit or turn them into chocolate cake truffles—just roll those pieces with a bit of cream cheese and dip in chocolate!
Freezing
Yes, you can freeze the unfrosted cake! Wrap well in plastic wrap and then in foil. It’ll stay delicious for up to 2 months. To thaw, simply place it in the fridge overnight before serving.
Reheating
For best results, gently reheat slices in the oven at 150°C (300°F) for about 10 minutes. This will keep it moist and fresh, just like the day you baked it!
FAQs
Can I use milk chocolate instead of dark chocolate?
Yes, but do bear in mind that the cake will be sweeter and less rich.
What can I use instead of eggs for a vegan version?
Consider using flax eggs or unsweetened applesauce as a binding agent!
How can I make this gluten-free?
Substitute all-purpose flour with a gluten-free blend that contains xanthan gum for best results.
Can I decorate this cake with fresh fruit?
Absolutely! Seasonal fruits like figs or slices of apple can add a lovely contrast and refreshing note.
Final Thoughts
As I sit here with a cozy cup of tea beside me, I’m filled with joy knowing you’ll embark on this delicious adventure. This Halloween, let the warmth of your kitchen come alive with the sweet scents of chocolate while you create lasting memories with your loved ones. Don’t shy away from adding your personal flair; let your creativity spill onto the cake. Happy baking, my friends, and may your day be filled with a little spookiness and a lot of sweetness! 🍂🎃
Chocolate Cake with Halloween Decorations
Ingredients
Method
- Preheat your oven to 180°C (350°F) and prepare a 9-inch round cake pan with butter and flour.
- In a bowl, melt the dark chocolate and butter together, stirring until smooth.
- In a separate large bowl, whisk together the sugar, oil, eggs, and vanilla extract until light and fluffy.
- Gradually mix in the melted chocolate mixture.
- Sift in the cocoa powder, flour, and baking powder with a pinch of salt.
- Carefully add the boiling water (and instant coffee!), mixing until you have a glossy batter.
- In a small saucepan, combine the condensed milk, cocoa powder, and a pinch of salt over low heat.
- Stir continuously until thickened and glossy—about 10-15 minutes.
- Add the butter and keep stirring until you reach a spreadable frosting consistency.
- Crush the Maria cookies and chocolate biscuits for topping.
- Warm up melted chocolate to create fun decorations.
- Once the cake has cooled, slice it into two layers.
- Spread a layer of brigadeiro frosting between the layers, then cover the top and sides with more frosting.
- Top with the crushed cookies for a crunchy flair and add playful decorations.