Table of Contents
The aroma of freshly pressed apple cider whirling through my kitchen—it’s a treat that ignites the senses and warms the heart! I still remember that first autumn when my grandmother invited me to help with her annual cider canning day. The air was crisp, leaves had turned to a buttery gold, and as we peeled apples, an orchestra of sweet and tart scents swirled around us. There was something about the tactile experience of mashing plump apples, the sound of the press, and the thrill of seeing that golden liquid flow that lit a spark in me. From then on, canning apple cider became a cherished family tradition, bringing with it not only delicious sips throughout the chilly months but also memories of laughter, warmth, and love.
And trust me, dear readers, you too will fall head over heels for this cozy canning adventure when you experience that first taste of homemade apple cider, bottled up for enjoyment. The rich, slightly spicy flavor notes and the vivid aroma will transport you to those golden autumn afternoons, no matter the season outside!
Why You’ll Love This Recipe
- Easy Peasy: With just a couple of steps to follow, you’ll be canning like a pro in no time!
- Quick Satisfaction: The process is straightforward, and you’ll be savoring your handiwork in just a couple of hours.
- Healthy Indulgence: There’s nothing like knowing your cider is pure and free from preservatives!
- Flavorful Goodness: Each sip is packed with a delightful balance of sweet and tart flavors, perfect for cozy evenings.
- Crowd-Pleasing Treat: Bring a jar to gatherings, and watch it disappear—everyone loves a taste of home!
Ingredients
Fresh Pressed Apple Cider: The star of our show! Look for local, organic apple cider if you can; it’ll taste so much better. This golden elixir is what gives your cider that kick of autumn goodness!
Bottled Lemon Juice: This little gem adds acidity and helps preserve color and flavor. Opt for freshly squeezed lemon juice if you have it, but bottled works just fine! It’s the secret ingredient keeping your cider bright and zesty.
Full recipe card is below.
How to Make It
Press the Apples
Gather your beautiful apples and dive right in! If you have access to a cider press, you’ll want to wash and quarter those apples (romas, cortlands, and honeycrisps are my favorites!). Pop them into the press, and as you crank down, inhale that heavenly aroma of fresh apple goodness! Don’t have a press? An apple juicer will work in a pinch, too!
Allow the Juice to Settle
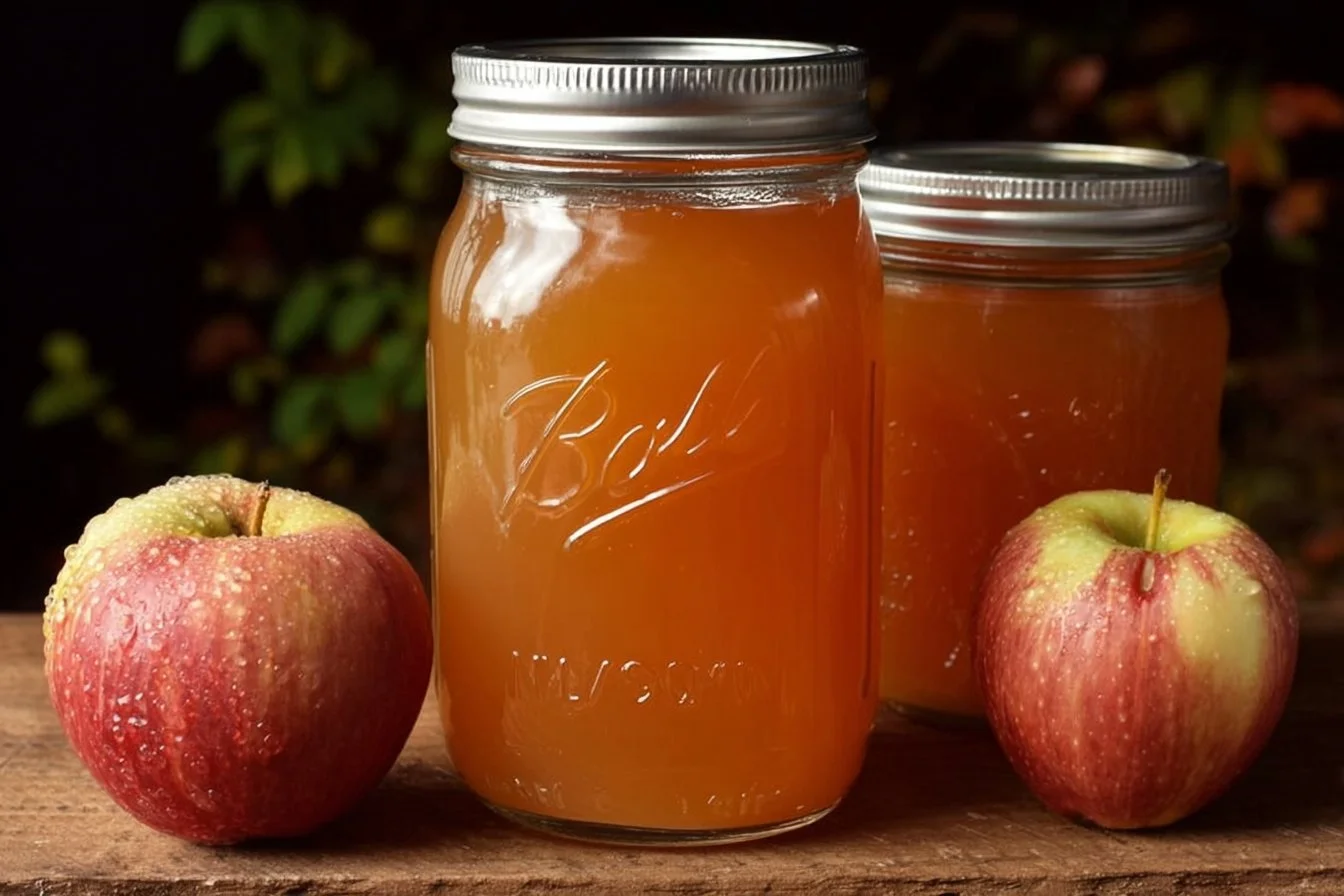
Once the juice flows, it’s okay if a little sediment doesn’t sit too pretty; if you’d like, refrigerate the juice for 24 to 48 hours to let all that gunky stuff settle at the bottom. Then, carefully ladle the clear juice into a large stainless-steel saucepan, pouring the sediment away.
Prepare Your Canner
As the juice warms up, get your canner ready! Preheat your canner for hot packing, and fill it with simmering water at around 180 to 190°F (82 to 88°C), so everything’s good and cozy when we pack those jars.
Heat the Apple Juice
In that lovely saucepan, heat the apple juice over medium-high heat until it hits 190°F (88°C). The smell will be absolutely intoxicating, trust me! Keep it at this temp for about 5 minutes to ensure everything is just right, then turn off the heat – you’re almost there!
Prepare the Jars
Measure 1 tablespoon of bottled lemon juice (or adjust according to the size of your jars!) into each hot jar. This is like a bright, zesty hug for your cider.
Ladle and Seal
Now, ladle the hot juice into the jars, taking care to leave about a 1/4 inch headspace. Wipe the rim to keep things clean, center those lids, and screw down the bands to fingertip-tight. Let’s keep those flavors tucked snugly inside, shall we?
Process the Jars
Place the jars in your boiling water canner and process for 10 minutes. If you’re at a higher altitude, check the adjustments. Once done, take a moment—remove the lid and let the jars rest for 5 minutes before lifting them out. This specialized break helps reduce any unexpected siphoning incidents; we don’t want to lose any precious cider!
Cool Down and Check Seals
Finally, let your jars cool completely on a towel or rack. Once they’re out of that hot water bath, give them a gentle press on the center of the lids—if they don’t pop back, you’re in business!
Pro Tips for Success
- Choose Quality Apples: The better the apples, the better the cider, so go for fresh and flavorful choices.
- Avoid Overheating: When heating the cider, keep things gentle; boiling can strip delicate flavors!
- Tidy those Rims: Always clean the rims before sealing. A little care goes a long way in ensuring a good seal!
- Check Jars for Cracks: Before you start, inspect your jars for any tiny cracks or chips to avoid mishaps.
Flavor Variations
- Spiced Cider: Add some cinnamon sticks, cloves, or star anise to your juice while it’s heating for a spiced version!
- Fruit Fusion: Experiment with fresh ginger slices or other fruit juices, like cranberry, to shake things up.
- Herb Infusion: Try infusing some rosemary or mint for an herbal twist—oh, the cozy vibes!
Serving Suggestions
- Pair a jar of your cider with a slice of warm cinnamon apple pie—it’s pure heaven!
- Enjoy some spicy mulled cider on a chilly evening, garnished with orange slices and cloves—perfect for gatherings!
- Cozy up by the fire with a hot mug and a fluffy blanket; this cider is the ideal companion!
Make-Ahead & Storage
- Your canned cider holds well! Store it in a cool, dark place—think your pantry or cellar. It’ll last for about a year, though I can’t promise it’ll last that long before you crack a jar open to relish those warm flavors!
Leftovers
- If you happen to have any leftovers (which, let’s be real, is a rarity), use them to create a delightful glaze for roasted vegetables or even mix them into pancakes for a festive breakfast treat!
Freezing
- Yes! You can freeze apple cider! Just pour it into freezer-safe containers, leaving some space for expansion. Thaw it overnight in the fridge before using it. Beware—frozen cider might lose some of its clarity, but the flavor remains delightful.
Reheating
- For reheating, stick your cider in a saucepan over medium heat, stirring occasionally, or pop it in the microwave for a quick fix. Just be mindful not to bring it to a boil!
FAQs
Can I use regular apples instead of specific cider apples?
Absolutely! While cider apples give a richer flavor, any good-quality eating apple will work just fine!
Can I can cider left out over night?
It’s best to process your cider as soon as possible to avoid the risk of fermentation or spoilage.
Will my cider be cloudy?
A little cloudiness can be typical. However, letting it settle for 24-48 hours will help clear up some of that sediment!
What should I do if my jars don’t seal?
It’s okay! Just refrigerate any unsealed jars and use them right away. No waste on my watch!
Final Thoughts
Canning apple cider is more than just a recipe; it’s a scrumptious way to dip your toes into the rewarding world of home preservation. It’s an excuse to gather loved ones, fill your kitchen with laughter (and the irresistible scent of apples!), and create something delicious to cherish all year long. I hope you find as much joy in this cozy craft as I have. Snuggle up with a jar, reminisce about those beautiful autumn days, and let every sip warm your heart. Happy canning, my friends! 🍏❤️
Homemade Apple Cider
Ingredients
Method
- Gather your apples, wash and quarter them. If you have a cider press, use it to extract juice from the apples!
- Allow the extracted juice to settle in the fridge for 24 to 48 hours to separate the sediment.
- After settling, carefully ladle the clear juice into a large stainless-steel saucepan, leaving the sediment behind.
- Preheat your canner and fill it with simmering water at around 180 to 190°F (82 to 88°C).
- Heat the apple juice in the saucepan over medium-high heat until it reaches 190°F (88°C) and hold it for about 5 minutes.
- Measure 1 tablespoon of bottled lemon juice into each hot jar, then ladle the hot juice into jars, leaving 1/4 inch headspace.
- Wipe the rim of each jar with a clean cloth, center the lids, and screw the bands on fingertip-tight.
- Place the jars in the boiling water canner and process for 10 minutes. Adjust for higher altitudes if necessary.
- After processing, let the jars rest for 5 minutes before removing them from the canner.
- Allow the jars to cool completely and check the seals by pressing the center of the lids.