Table of Contents
How I love the warm, zesty aroma of my kitchen when I whip up a batch of Air Fryer Fried Pickles! Let me take you back to the first time I tossed these crispy delights into my air fryer. It was a rainy afternoon, and I found myself craving something salty and satisfying. As I rummaged through the pantry, I spotted a jar of dill pickles staring back at me like an old friend. The idea struck me like a bolt of lightning: Why not fry them? Of course, I had to put my air fryer to good use!
As I dipped those pickle slices into flour, egg, and breadcrumbs, my kitchen filled with the most mouthwatering scent. The crunch that followed as they cooked was utterly satisfying, and when I finally took my first bite, the explosion of flavors was heavenly. The perfect balance of tangy and crispy filled my mouth, wrapping me in a cozy culinary hug. These air-fried beauties quickly became a favorite—not just for me but for friends and family too! And I promise, once you try them, they’ll be a staple in your kitchen as well.
Why You’ll Love This Recipe
- Easy and Quick: Perfect for a last-minute snack or appetizer, ready in under 20 minutes!
- Healthier Option: Skip the deep frying without skipping the crunch—yes, please!
- Crowd-Pleasing: These little bites are always a hit at parties, gatherings, or a cozy night in.
- Flavorful Fun: The tangy pickles combined with a crispy coating bring the best of both worlds.
- Customizable: Simple to tweak with your favorite spices or dipping sauces!
Ingredients
- Dill pickles (or your preferred type of pickles): The stars of the show! Choose your favorite brininess—pickles are like little flavor bombs!
- 1 cup breadcrumbs: For that irresistible crunch! I recommend panko for an extra crispy texture.
- 1/2 cup flour: Helps the egg stick to the pickles, creating a beautiful, even coating.
- 2 eggs: Binding magic! Beating the eggs ensures they coat evenly and keep the breadcrumbs in place.
- Salt to taste: Enhances flavors! Don’t be shy—season to your heart’s content.
- Pepper to taste: A little spice goes a long way. Feel free to add more for a kick!
- Cooking spray or oil for frying: A light spray keeps the pickles crispy. You want that golden goodness!
Full recipe card is below.
How to Make It
1. Slice the Pickles
Start by slicing those dill pickles to your desired thickness! A quarter-inch thick works beautifully—enough to hold up during frying. The crunch will be oh-so-satisfying!
2. Set Up a Breading Station
Get three bowls ready! In the first, place the flour. In the second, beat the eggs until they’re frothy and happy. In the third, mix the breadcrumbs with a sprinkle of salt and pepper. Organization is key, my friend!
3. Dip Each Pickle Slice
Now the fun begins! Dip a pickle slice into the flour, coating it completely. Next, take a delightful plunge into the egg mixture, letting any excess drip off. Finally, roll it in the breadcrumb bowl, ensuring it’s coated evenly. Feel free to get your hands a little messy—it’s part of the joy!
4. Preheat the Air Fryer
Pop your air fryer on and preheat it to 400°F (200°C). The anticipation is half the fun, right?
5. Arrange in the Air Fryer
Place the breaded pickles in the air fryer basket in a single layer. Remember, we want them to crisp up nicely! Give them a gentle spray of cooking spray to help them brown beautifully.
6. Cook and Enjoy
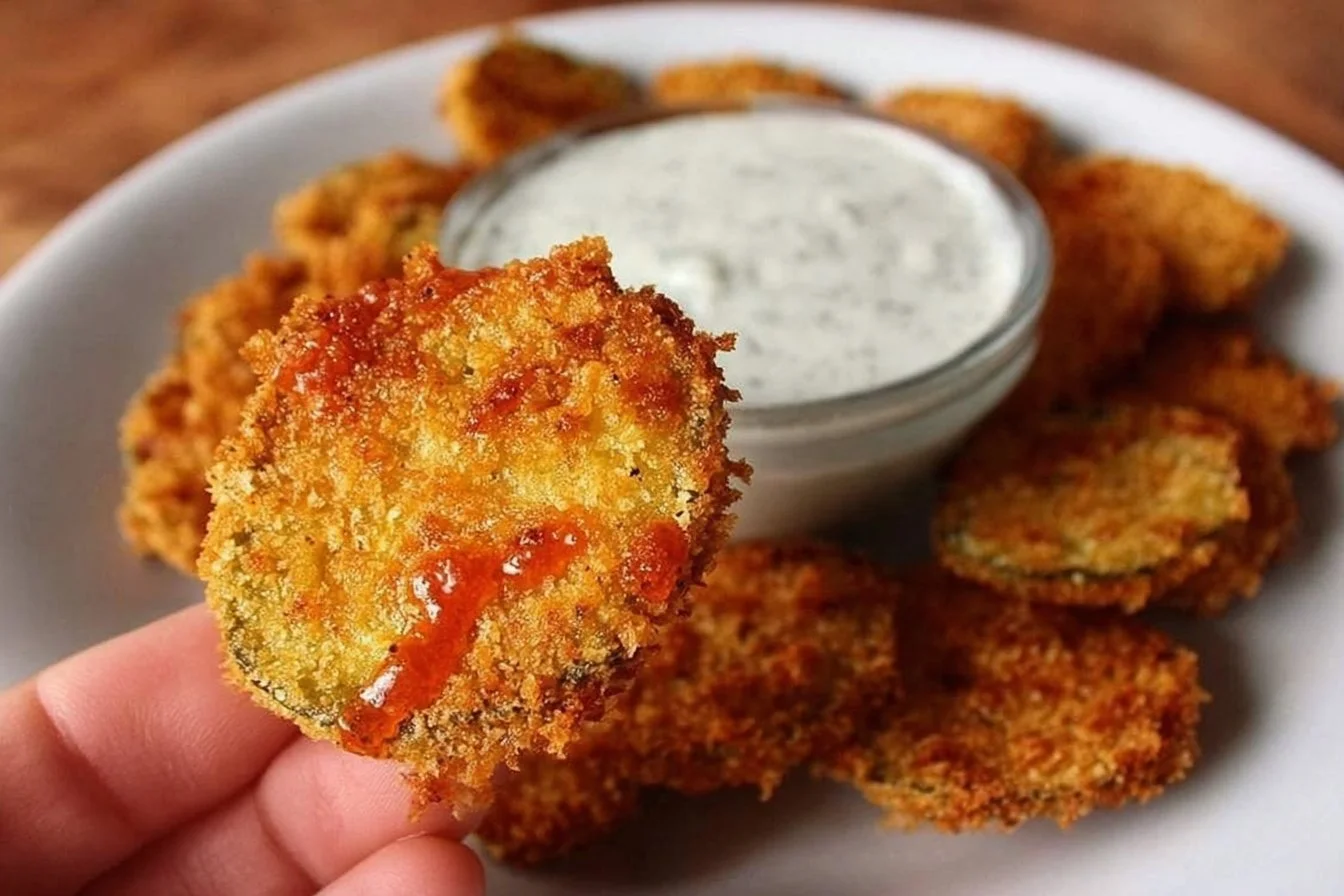
Let them cook for about 8-10 minutes or until they turn a gorgeous golden brown. Oh, can you smell that? The kitchen will be filled with the most heavenly aroma.
7. Serve Warm
Serve those delicious fried pickles warm with your favorite dipping sauce—ranch or a tangy remoulade are top contenders!
Pro Tips for Success
- Don’t overcrowd the basket: Fry in batches if necessary to ensure even cooking.
- Experiment with seasoning: Feel free to add garlic powder or smoked paprika for an extra flavor kick.
- Perfectly slice your pickles: For a consistent cook, aim for even thickness when slicing.
Flavor Variations
- Spicy: Add cayenne pepper or chili flakes to your breadcrumb mixture.
- Sweet & Sour: Try using bread and butter pickles for a sweeter version.
- Herbs & Spices: Mix dried herbs like dill, oregano, or even a touch of parmesan cheese into your breadcrumbs for a flavor twist!
Serving Suggestions
These fried pickles are fantastic on their own, but they shine when paired with a zingy dipping sauce! Present them on a colorful platter, alongside some crispy veggies or delicious chicken wings. To drink? A chilled beer or a sparkling lemon soda is a perfect match!
Make-Ahead & Storage
You can prepare the breading elements ahead and store them in the fridge. Just assemble and fry when you’re ready to feast! Cooked pickles last about 3 days in an airtight container in the fridge.
Leftovers
Have leftover fried pickles? Toss them into a salad for a delightful crunch or chop them and mix with cream cheese for a quirky spread on crackers!
Freezing
While it’s best to enjoy them fresh, you can freeze uncooked breaded pickles in a single layer before storing them in a freezer bag. Just add a few extra minutes to the cooking time when you fry them!
Reheating
For the best results, reheat them in the air fryer or a skillet on medium heat until they’re warm and crispy again. The microwave will make them a bit soggy, so I advise against it.
FAQs
Can I use other types of pickles?
Absolutely! Try using sweet pickles or even pickle spears—whatever tickles your taste buds!
Do I need to peel the pickles?
Nope! The skins are part of what gives them that delightful crunch. Leave them on for maximum flavor!
How can I make these gluten-free?
Simply substitute regular breadcrumbs & flour with gluten-free alternatives; they’ll turn out just as crispy!
Can I bake these instead of air frying?
Sure! Bake them in a preheated oven at 425°F (220°C) for about 15-20 minutes for a baked version—just be sure to flip them halfway through!
Final Thoughts
There you have it, my friends! Air Fryer Fried Pickles are not just a snack; they’re a delightful experience that whisks you away to cozy gatherings and joyful moments. Each crispy bite is an invitation to celebrate those little things that make life delicious. I can’t wait for you to try this recipe in your own kitchen! Gather your loved ones, share some laughs, and indulge in these crunchy morsels. Happy cooking! 🌟
Air Fryer Fried Pickles
Ingredients
Method
- Slice the pickles to your desired thickness, aiming for about a quarter-inch.
- Set up a breading station with three bowls: flour in the first, beaten eggs in the second, and breadcrumbs mixed with salt and pepper in the third.
- Dip each pickle slice into the flour to coat, then into the egg mixture, and finally into the breadcrumbs, coating evenly.
- Preheat your air fryer to 400°F (200°C).
- Arrange the breaded pickles in the air fryer basket in a single layer and spray lightly with cooking spray.
- Cook for about 8-10 minutes or until golden brown.
- Serve warm with your favorite dipping sauce.